How to Write a Business Check, The Complete Guide
As a small business owner or entrepreneur you have many choices for making payments and managing your finances effectively. Often times, writing a business check might be the best choice. A business check serves as a formal payment instrument drawn against funds held in a business bank account specifically designated for business related transactions.
While it may seem convenient to simply use a personal check to pay for expenses there are distinct advantages to opting for business checks. First off, using business checks reinforces your company’s brand image and credibility by providing a professional appearance to clients, vendors and creditors. Furthermore, using business checks ensures a clear separation between personal and business finances and simplifies record keeping and financial management, essential for accounting and tax purposes. For more information on how these types of checks differ, see our guide on the differences between business checks and personal checks.
When are business checks used?
While modern technology offers numerous payment options, there are still situations where a company may find paying with a check is the most suitable choice. This includes scenarios when you might need to pay vendors who lack electronic payment acceptance, or one-time expenses where the simplicity of a check outweighs the time needed to set up an online account for payment. Additionally, check payments can help you avoid transaction fees associated with electronic payment methods. Moreover, for business keen on flexible payment timing or documenting proof of payment, checks remain a steadfast choice.
Having covered when and why you should opt for a business check, let's dive into the proper procedure to issue one correctly.
Get to know the parts of a business check
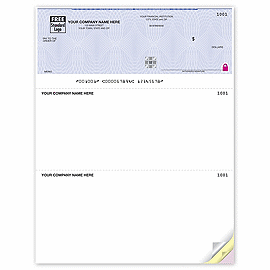
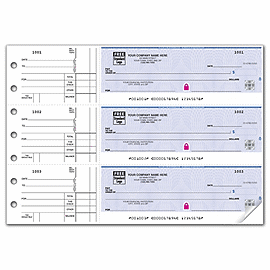
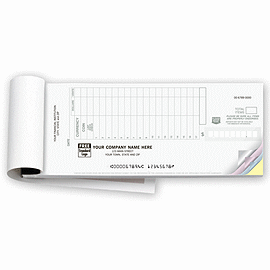
Understanding the components of a business check and the distinct purpose of each part in the transaction process will help ensure accuracy. It's good to familiarize yourself with the different parts of a business check before writing one.
- Business information: printed in the upper left corner. This information should include the legal business name and address, it may also include contact method (phone, fax or email) and a business logo.
- Date: typically found at the upper right of the check. Include the month, day and year that you want the check to be valid for or the current date (e.g. February 28, 2024).
- Pay to the Order of: at left, center of the check. This is the payee, or the recipient of the payment. Make sure to use their legal name, spelled correctly.
- Payment amount in numbers: located at the middle right of the check. This is the payment amount in a numerical format using a decimal point to separate the dollars and cents. (e.g. 147.89).
- Payment amount in words: located just below Pay to the Order of. This is the payment amount in words, starting with the dollar amount, followed by “and”, then the cents portion. (e.g. One hundred forty-seven dollars and 89/100).
- Memo line: the line located on the lower left of your check. Use this line to briefly describe the purpose of the payment, invoice number or other helpful information for record keeping.
- Signature line: the line located on the bottom right of your check. The payer's signature must match the authorized signature on file with your financial institution.
- Routing number: the first set of numbers located on the bottom left corner of your check. The nine-digit number identifies your financial institution.
- Account number: the second set of numbers located on the bottom of your check. This number matches your business account at your financial institution.
- Check number: the third set of numbers printed on the bottom of your check and in the upper right corner. These numbers should match.
- Bank's name and address: this is printed near the bottom of the check. This helps the recipient's financial institution know from which bank to request the payment.
Writing a business check
While many businesses may use computer-printed checks for efficiency, handwritten checks are still commonly used especially for small business or occasional payments. Whether you choose to handwrite the business check or print on a computer you'll want to ensure that all the required information is accurate and legible.
Here is a step-by-step guide to help you navigate writing and using business checks with confidence.
- Start with the date. It may seem straightforward that you would use the current date. However, you may want to post-date the payment to indicate that the payment should not be cashed or deposited until a specific date, such as an invoice due date.
- Complete payee and payment amount. Be sure to use the full name of the company or individual you need to pay in the Pay to the Order of field. Enter the payment amount in numerical format and in words. It's always best to have your invoice or bill close at hand to ensure accuracy.
- Record the purpose of the payment. While this is optional, recording a brief description of the payment or including an invoice number in the memo line is useful for your record keeping and for the payment recipient.
- Sign the check as the authorized account holder. This step is crucial, as it validates the check and authorizes the payment. If your business chooses to require two signatures, you must get both before issuing the payment. A signature stamp can streamline this process.
- Record the payment Don't lose track of how much money you've paid. Record the payment details in your business register, disbursement journal or on the end-stub of your check.
How to void a business check
At some point you may need to void a check whether for an EFT or because incorrect information was added in the process of writing the check. Voiding a check ensures it won't be cashed, deposited, or used by anyone fraudulently. Here is how to void a business check:
- Write “VOID” in large letters across the front of the check in blue or black permanent ink.
- Record the check number as void in your records.
- Securely depose of the voided check.
Mastering the essentials of writing business checks is essential to streamlining financial operations. By employing the insights gained from this article you can navigate issuing business checks with confidence, ensuring professionalism, and fostering trust in your business endeavors.
Check out our other guides to learn more about the types of business checks and the differences between business checks vs personal checks
If you need help deciding which checks your business needs based on how you use them, see our recommended business checks.
Top Selling Products


 CheckFinder